Skin Making Tutorial
Last updated: 28/12/2020
File Size: 2.99 MB
Before creating a complete skin, you will need the following tools. There are some suggestions below, but we don’t necessarily endorse or require you to use any of them. We leave you to choose one that you’re most comfortable with.
Stuff you need:
1. A paint program such as Photoshop, Gimp, or even good old MSPaint will work too. How else will you “paint” your skins? Must be able to recognize the .BMP format.
2. Winamp’s Base 29x Skin – to use as a template.
3. Text Editor – For use in configuring the fonts and colors of the Mini-browser and Playlist editor. Also used if you do any transparency. eg. MS Notepad, MS Word, Corel Wordperfect
4. Icon Editor – You will need an Icon editor if you are hardcore and want to edit the cursors and pointers associated with your skin. eg. NeoSoft Icon Editor, Icon Edit Pro, Impact Microangelo
5. Zip Compression Tool: Absolutely necessary to publish your skin. Winamp.com will not accept an unzipped skin. eg. WinRAR PKZip, WinZip
6. A good imagination and a good attitude 🙂
The general process is pretty easy. Simply create a new folder in your Winamp\Skins directory. For example, go to your Skins directory in file manager, right click, and choose ‘New Folder’. Name the folder something unique, like ‘NewSkin’. Unzip the Winamp Base Skin into that folder using your favorite unzip utility.
Once you’ve installed the Base Skin, you could look at the files in that folder. Inside the folder should be a whole bunch of .cur (cursor) files, a whole bunch of .bmp files, and a few (3) .txt files. All of these files are optional. Any missing files will use Winamp’s defaults. So, for example, you can just change one cursor in a skin by having a single .cur file.
The names for the cursor files are pretty self explanatory. In addition, EQTitle.cur means that this cursor is for the EQ’s title bar. normal.cur is the default cursor used in Winamp’s main window. PWSSize.cur means that this cursor is for the Playlist Editor Window Shade sizing area. and so forth. If in doubt, you can just try making a major change to see where the change takes effect. You will see cursor changes, there’s no need to reload the current skin in Winamp to see them. To edit cursors, we recommend any paint program.
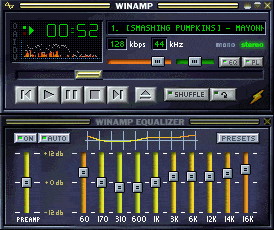
Editing the BMP files is more complicated. ‘pledit.bmp’ changes the look of the Playlist Editor, ‘eqmain.bmp’ changes the look of the Graphical Equalizer, and all the other .bmp files change the look of individual controls of the main interface [why we didn’t just use a single .bmp file for the main interface like we did for the EQ/PL is a different story]. Once you have made modifications to the different BMP files, press F5 in Winamp to re-upload the pictures.
At the end, you can change other aspects of Winamp using the three .txt files included in the Skin. After modifications to these files, be sure to press F5 in Winamp to reload the skin.
where is the folder for the base skin and/or where do I get it? When I open winamp it uses the base skin, but it’s not in the skins folder.
This seems to be the only “mantained” site in 2020 about winamp skin modding.
I would totally love to know how to create a custom (winamp 5) non-uniform freestyle modern-skin.
I don’t understand how to “read” or “output” the HTML (XML) code in an Editor? What editor do I use to VIEW changes in realtime before exporting the .ico, .bmp and the .xmls?
Please help.
Thanks.